
Modelling Tips
scenic model railways'
Modelling Tip No. 19
Super Elevation.
Modelling Tip No. 19
Super Elevation.
I read somewhere recently that super elevation – the banking of track on the curves – was difficult to achieve on a model railway and not really worth attempting. My eyebrows lifted a notch because I have always found it to be one of the easiest of jobs, and the effort – on a larger layout at any rate – is well worth it.
Fix down your track in the normal way – I recommend one pin at least every 2" – and 'road test' it thoroughly. Before adding the ballast, slip a length of micro strip under the ends of the sleepers on the outside of the curve. I find that 30 thou x 100thou strip is ideal and gives a nice subtle banking, but experiment with different thicknesses if you wish. Carry on round the curve. When done, add a lead-in at each end of the curve with about 3' of 20thou (if you've used 30 thou) and 3" of 10thou. Ballast the track in the normal way.
The siding, the rusty rails of which are just visible in the picture, can be found on the Tonbridge to Hastings main line a few yards North of High Brooms Station. Originally built for the High Brooms Brickworks, the siding was used in more recent times by the Shell Oil Co. to supply their heating oil depot which still is still in use and is situated just behind the photographer. Oil tank wagons were a regular sight on the siding until the early 1990s, but the depot is now supplied by road and the siding and its fittings are disused. The two structures were already derelict when the tank traffic ceased, but I believe that they were originally built as platforms to give access to the filler caps on the top of the wagons.
The siding is adjacent to extensive light industrial estates and I believe RailTrack not so long ago offered to reinstate it if any of the companies were interested in using it. Sadly there were no takers!
Fix down your track in the normal way – I recommend one pin at least every 2" – and 'road test' it thoroughly. Before adding the ballast, slip a length of micro strip under the ends of the sleepers on the outside of the curve. I find that 30 thou x 100thou strip is ideal and gives a nice subtle banking, but experiment with different thicknesses if you wish. Carry on round the curve. When done, add a lead-in at each end of the curve with about 3' of 20thou (if you've used 30 thou) and 3" of 10thou. Ballast the track in the normal way.
and the answer to the Tip no.17 picture puzzle.....
The siding, the rusty rails of which are just visible in the picture, can be found on the Tonbridge to Hastings main line a few yards North of High Brooms Station. Originally built for the High Brooms Brickworks, the siding was used in more recent times by the Shell Oil Co. to supply their heating oil depot which still is still in use and is situated just behind the photographer. Oil tank wagons were a regular sight on the siding until the early 1990s, but the depot is now supplied by road and the siding and its fittings are disused. The two structures were already derelict when the tank traffic ceased, but I believe that they were originally built as platforms to give access to the filler caps on the top of the wagons.
The siding is adjacent to extensive light industrial estates and I believe RailTrack not so long ago offered to reinstate it if any of the companies were interested in using it. Sadly there were no takers!
scenic model railways'
Modelling Tip No. 18
Coal Merchant's House and Office.
Modelling Tip No. 18
Coal Merchant's House and Office.
*Sadly, due to circumstances beyond my control, I will now not be able to publish the article on of this conversion as promised in the March Modelling Tip. However, I can publish a photo of the original building and you are very welcome to work out the details for yourselves.
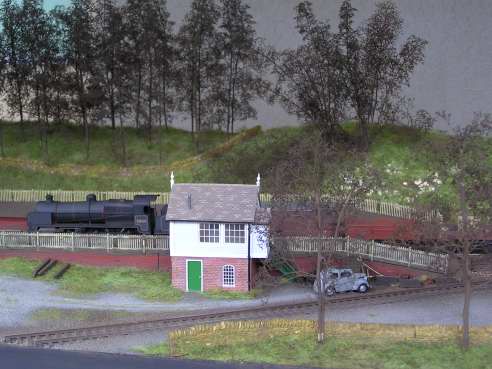
A few weeks back, one bright and frosty morning, I found myself in Tonbridge with two hours to kill. I resisted the temptation to window shop, and spent the time wandering round the back streets around the railway station. Within minutes, I came across a gem of a building – a coal merchant's house and office – once common place but rarely modelled on layouts. Strikingly similar to a building in a well known off-the-shelf range, just a simple conversion job would be necessary to achieve the necessary 'change of use'.
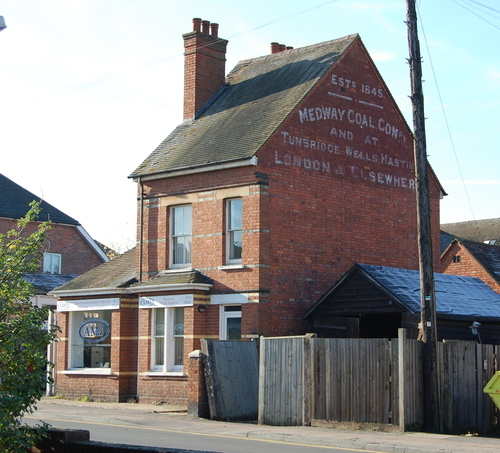
A few weeks back, one bright and frosty morning, I found myself in Tonbridge with two hours to kill. I resisted the temptation to window shop, and spent the time wandering round the back streets around the railway station. Within minutes, I came across a gem of a building – a coal merchant's house and office – once common place but rarely modelled on layouts. Strikingly similar to a building in a well known off-the-shelf range, just a simple conversion job would be necessary to achieve the necessary 'change of use'.
Tonbridge, October 2007
scenic model railways'
Modelling Tip No. 17
"....observation, observation, observation".
(with apologies to Mr Blair)
`Happy modelling'.
Modelling Tip No. 17
"....observation, observation, observation".
(with apologies to Mr Blair)
The three most important tools in the creation of realistic scenery are observation, observation and more observation! When you are creating the scenery for a model railway, you have to consider EVERY aspect of it – colours, patterns, textures, the position and relationship of buildings and structures to their surroundings, etc. When you are out and about, teach yourself to look around you and observe your surroundings. Don't just watch the path in front of you, OBSERVE everything you see – the colour and patterns of tarmac, the structure of hedges, types of fencing and gates, brick walls, details of buildings, telegraph poles, street lamps, pillar boxes, types of roofing, TV aerials, the colour of the grass and crops in the fields, outbuildings, road works, building sites, gardens, car parks, pot holes, drains, windows, guttering.....I could go on for ever! Don't just admire unusual buildings, take in the 'normal' as well (unless you are planning to model a scene from Harry Potter!). You don't need to concentrate or take notes or photos, over a period of time your mind will do that for you and when the time comes it will tell you whether or not you have got the model right!
If you do have time to think about what you see, pick an object or scene that you happen to be passing and ask yourself how you would model it. What materials would be best, what colours would you use, where have you seen a particular item in a manufacturer's range, and so on. Ask yourself why a particular building is where it is. Has it undergone a change of use, and, if so, what was it originally? What was that old outbuilding in a back yard for?
I could go on, but you get the idea.
A few weeks back, one bright and frosty morning, I found myself in Tonbridge with two hours to kill. I resisted the temptation to window shop, and spent the time wandering round the back streets around the railway station. Within minutes, I came across a gem of a building – a coal merchant's house and office – once common place but rarely modelled on layouts. Strikingly similar to a building in an off-the-shelf range, just a simple conversion job would be necessary to achieve the necessary 'change of use'. This attractive and simple project will be the subject of my next Modelling Tip.*
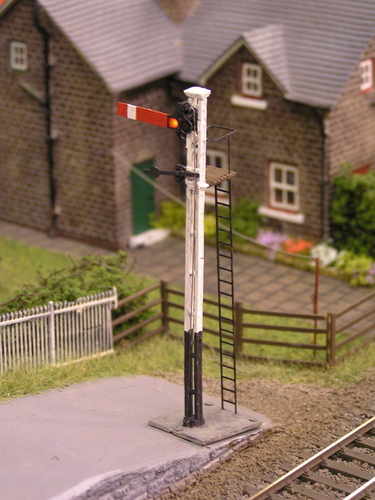
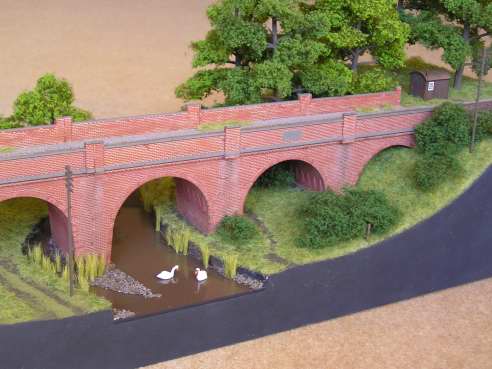
To get you thinking (and observing!), I have a puzzle for you. Not far from where I live are two derelict brick structures by the side of the road. Here is a picture of one of them - can you guess what it is, or rather was? There is a small clue in the picture if you look carefully.
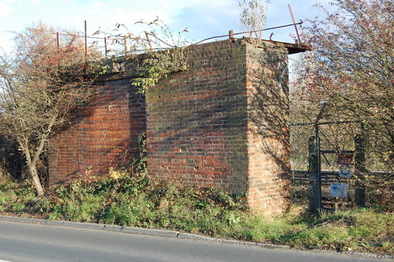
Please feel free to e-mail me if you think you know the answer, but I regret that, due to pressure of time, I will not be able to reply. I will give the answer next month.
22/3/08 – As there is only a week to go and I have yet to receive a correct answer, I'll give you some clues......So far as I'm aware it hasn't lost anything important except probably a ladder, and, although a bit battered, is much as it would have been when in use. I mentioned that it was one of a pair, but the second one (which has lost it's top) is about 20 yards to the left of this one – on the same side of the tracks. Note the remains of the railings on top of it.
*With considerable regret, and due circumstances entirely beyond my control, I will now not be able to publish details of this conversion.
If you do have time to think about what you see, pick an object or scene that you happen to be passing and ask yourself how you would model it. What materials would be best, what colours would you use, where have you seen a particular item in a manufacturer's range, and so on. Ask yourself why a particular building is where it is. Has it undergone a change of use, and, if so, what was it originally? What was that old outbuilding in a back yard for?
I could go on, but you get the idea.
A few weeks back, one bright and frosty morning, I found myself in Tonbridge with two hours to kill. I resisted the temptation to window shop, and spent the time wandering round the back streets around the railway station. Within minutes, I came across a gem of a building – a coal merchant's house and office – once common place but rarely modelled on layouts. Strikingly similar to a building in an off-the-shelf range, just a simple conversion job would be necessary to achieve the necessary 'change of use'. This attractive and simple project will be the subject of my next Modelling Tip.*
To get you thinking (and observing!), I have a puzzle for you. Not far from where I live are two derelict brick structures by the side of the road. Here is a picture of one of them - can you guess what it is, or rather was? There is a small clue in the picture if you look carefully.
Please feel free to e-mail me if you think you know the answer, but I regret that, due to pressure of time, I will not be able to reply. I will give the answer next month.
22/3/08 – As there is only a week to go and I have yet to receive a correct answer, I'll give you some clues......So far as I'm aware it hasn't lost anything important except probably a ladder, and, although a bit battered, is much as it would have been when in use. I mentioned that it was one of a pair, but the second one (which has lost it's top) is about 20 yards to the left of this one – on the same side of the tracks. Note the remains of the railings on top of it.
*With considerable regret, and due circumstances entirely beyond my control, I will now not be able to publish details of this conversion.
`Happy modelling'.
scenic model railways'
Modelling Tip No. 16
Scenic Model Railways Product of the Year Award 2007
goes to...
'The Bouncer'
Modelling Tip No. 16
Scenic Model Railways Product of the Year Award 2007
goes to...
'The Bouncer'
Once in a while something comes along that revolutionizes the world of model railways. For instance, in recent years we have had Seamoss trees, DCC, lightweight filler, static grass, and die-cast period cars. In my opinion, we can now add a new item to the list – "The Bouncer".
Anyone with solenoid or motor operated semaphore signals will be familiar with drooping or somersaulting arms, broken stops, and signals that take a major operation to re-adjust only to droop again the next day. Be honest – how many of us put up with wonky signals rather than face yet another rebuild? I know I do, or rather did before I discovered "The Bouncer".
Imagine......the pick-up goods held in the loop by a signal as the up express thunders by. As the express disappears into the distance, the signalman switches the points and clears the signal for the goods. The arm rises smoothly, pauses slightly half way up as the signalman struggles with the heavy lever, before coming to rest at clear with a slight bounce. The goods moves off and the signal drops back to danger, this time with a more noticable bounce before coming to rest neatly at horizontal. As the goods clears the level crossing, the first gate swings slowly shut behind it, bouncing against the post before the second gate starts to move with a slight judder to leave the road clear for the cars.......
We are talking 00 here. Not quite happy with the amount of bounce or the angle of the arm? No problem, just plug in the little hand-held control box, select the signal concerned, and twiddle a couple of knobs to adjust the movement. 10 seconds – job done. You don't have to touch the signal!
Are there any snags? Well, the system is so easy to set up in the first place that it takes all the challenge out motorizing your signals, and once set up the system is so much fun that you'll not bother running any trains!
"The Bouncer" is made by Full Stop Signals. Want to know more?.....click on
scenic model railways'
Modelling Tip No. 15
Loco Shed Ballasting with Real Ash
Part 2 – Puddles
Modelling Tip No. 15
Loco Shed Ballasting with Real Ash
Part 2 – Puddles
To be read in conjunction with modelling tip No.9
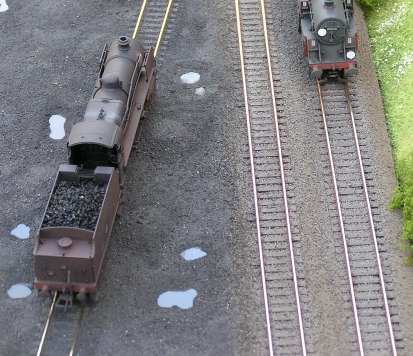
Puddles are so common at this time of year that we tend to walk through, over or round them without even noticing, yet they are rarely modelled. The following steps refer to the use of real ash to ballast a loco depot, but the method would apply equally well when using ordinary ballast or any other modelling medium such as filler or mod rock.
Take a sheet of clear acetate – 20 thou would be ideal – preferably the kind that has protective film on both sides. Remove the protective film from one side only and spray or paint that side with RailMatch weathered black or similar (or brown for muddy areas). When dry, cut the sheet into pieces roughly an inch square and glue the pieces with PVA – paint side down – in the positions that you want your puddles. When dry, carry on with step 2 of the January 2007 modelling tip, leaving a puddle-shaped area clear of filler on each square. The clear area should be slightly larger than the finished puddle.
Next, with the point of a scalpel, very carefully cut out and remove the protective film from the puddle shapes. Proceed with step 3, leaving the puddle shapes clear of PVA but allowing the PVA to over lap the cut edges of the puddles very slightly. Sprinkle on the ash or ballast, and, when dry, vacuum off the surplus – if you use a brush, make sure it is a very soft one as the surface of the acetate is very easily scratched.
Before carrying out step 4, carefully paint the surface of each puddle with a masking fluid such as Humbrol Maskol and allow to dry. Complete steps 4 and 5, and carry out any other work planned for the area before carefully removing the Maskol – cut round the edge if necessary – and exposing your puddles!
scenic model railways'
Modelling Tip No. 14
An easy and reliable way to operate semaphore signals.

`Happy modelling'.
Modelling Tip No. 14
An easy and reliable way to operate semaphore signals.
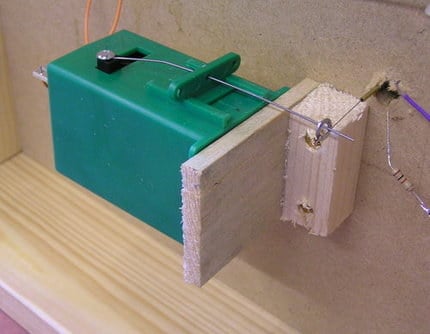
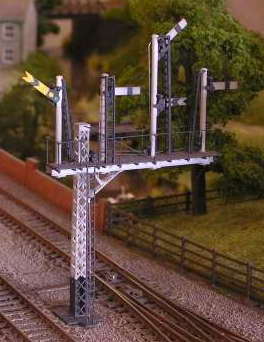
There are many tried and tested ways of actuating semaphore signals, but most are either too rough with delicate signals, are unreliable, or require frequent adjustment. The following method is quick and easy to set up, needs no complicated linkages, is maintenance free and kind to the delicate signals. The signal arms rise and fall at a realistic speed, although I have yet to achieve that sought-after 'bounce'!
Assemble the signal in the normal way with the operating wire (brass or nickel-silver, not piano wire) passing straight through the signal base with about two inches of wire projecting below the base board.
Assemble a Tortoise point motor as per its instructions and mount it on a piece of thin plywood at right angles under the base board so that the Tortoise wire operates up and down, just touching the signal wire at right angles and projecting roughly half an inch beyond it. Solder a small washer to the signal wire so that the Tortoise wire passes freely through it. Wire up the Tortoise through a double throw switch.
Two or three Tortoise motors can be positioned to operate the arms of a bracket signal without complication.
Once working, adjust the throw of the Tortoise wire using the plastic slider and, if necessary, by bending the wire slightly. Once set up, you should have a reliable and maintenance free mechanism. The built-in micro switches on the Tortoise can be used to operate LEDs or to isolate a section of track to stop a train when the signal is at danger.
`Happy modelling'.
scenic model railways'
Modelling Tip No. 13
A simple improvement for die-cast road vehicles.
Modelling Tip No. 13
A simple improvement for die-cast road vehicles.
One disadvantage of using die-cast cars and trucks on a 4mm layout is that the high-gloss paintwork – very pretty on the collector's shelf – detracts from the realism of the models when used trackside. Vehicles from such makes as Classix, Corgi, EFE, Base and Oxford all suffer from this problem. The solution is simple – a coat of satin varnish applied by brush to all the gloss areas gives the vehicle a much more realistic appearance. I find enamel varnish such as Railmatch easier to use than acrylic. Make sure the model is clean and dust-free before painting, and be careful to keep the varnish off glass, tyres, flatbeds, etc. If required, weather the vehicle after varnishing.
A word of warning....
Corgi have taken to oiling the axles of some of their models. The oil needs to be removed with detergent and warm water and the model dried thoroughly (in the airing cupboard?) before varnishing. Even if you are not intending to varnish the model, the oil is best removed or it can soak into and stain the painted road surfaces of your layout - incredibly annoying if you have just airbrushed your roads!
`Happy modelling'.
A word of warning....
Corgi have taken to oiling the axles of some of their models. The oil needs to be removed with detergent and warm water and the model dried thoroughly (in the airing cupboard?) before varnishing. Even if you are not intending to varnish the model, the oil is best removed or it can soak into and stain the painted road surfaces of your layout - incredibly annoying if you have just airbrushed your roads!
So if you read this, Corgi, please desist from your oily practices!
scenic model railways'
Modelling Tip No. 12
Ballasting trackwork across baseboard joins can lead to expansive and expensive problems!
Modelling Tip No. 12
Ballasting trackwork across baseboard joins can lead to expansive and expensive problems!
On layouts where trackwork crosses the joins between MDF or chipboard boards, problems can occur when the diluted glue/detergent mix used to ballast the trackwork seeps down into the join. The glue soaks into the edge of the board causing it to swell, lifting the track into a pronounced hump. If this happens, the swelling and the hump are there to stay!
There is no easy way to cure this once it has happened other than to scrap the lot - boards and all - and start all over again! Ouch!
Fortunately the problem is easy to avoid. Before laying your boards, seal the edges where the track is likely to cross with undiluted PVA such as Unibond. Later, when you are ready to start laying the track, paint the entire track bed area with a coat of PVA - it must be undiluted - making sure you include all areas to be ballasted and allowing a generous margin on either side. Take particular care to seal board joins, screw holes and any other breaks in the surface of the board. When dry, repeat with a second coat. Once your track has been laid, before you start ballasting, check for and PVA any new holes such as wiring or point motor holes. Hopefully this should stop any problems, but it is always wise not to be too generous with your ballasting glue just in case.
This may sound like overkill - it probably is, but the alternative doesn't bare thinking about!
Of course, if you want a hump-shunting layout, please feel free to disregard the above!
scenic model railways'
Modelling Tip No. 11
101 uses for aerosol can lids
Next time you use a can of spray paint, hang onto the lid! I find them one of the most useful items in my 'tool box' - and they're free!
My work bench is covered in them.
Herewith just a few ideas -
Modelling Tip No. 11
101 uses for aerosol can lids
Next time you use a can of spray paint, hang onto the lid! I find them one of the most useful items in my 'tool box' - and they're free!
My work bench is covered in them.
Herewith just a few ideas -
- Storage of small items - loose kit parts, electronic components, fish plates, track pins, etc, etc.
- Dispensers for track ballast and scatter material. I find them absolutely ideal for this - just the right size and shape, and much easier to handle than spoons or commercially available applicators.
- Mixing pots for glue, paint, scatter material or anything else that needs to be mixed.
- Holder for syringe, pipette or what ever you are using to apply glue to ballast, and use another one for the glue itself.
- Holder for Superglue bottles, etc., to stop them falling over.
Believe me, how ever many tops you manage to collect, it will never be enough!
scenic model railways'
Modelling Tip No. 10
Straightening Seamoss Trees
Somehow there always seems to be a few sprigs of Seamoss left over from every box that are so banana shaped as to be useless. Well, that need not be the case any longer.
I mentioned in December's tip that seamoss could be strengthened by inserting piano wire up through the trunk. To straighten a bent tree, feed thin (15thou) piano wire carefully up the inside of the trunk until it breaks through the side. At the point where the wire comes out, cut off the top of tree with scissors and pull the wire through. Now start to feed the wire up into the top section of the tree until it breaks through again. Repeat until the wire nears the top. The breaks in the trunk can then be sealed with low viscosity super glue. When dry, carefully straighten out any remaining curves by bending the trunk - and the wire inside it - with your fingers.
DANGER. Bear in mind that you now have a forest of fragile trees each with a not-so-fragile and very sharp 6" spike of piano wire hidden inside it sticking straight up from your board. Do not use this method where children are involved, or where the trees could accidentally come into contact with eyes and faces.
scenic model railways'
Modelling Tip No. 9
Loco Shed Ballasting with Real Ash
You can't beat using real materials where possible, real coal in loco tenders and coal staithes being the obvious example. Any one who has tramped round a preserved railway loco shed will remember the black, gritty, greasy, compacted 'stuff' underfoot - usually a mix of coal dust and loco ash. I have been experimenting with real ash to simulate this and have come up with a procedure that I think gives a realistic result. Ash is dirty messy stuff and difficult to work with, and this is not the easiest of jobs - bear this in mind!
Step 1 - obtain some ash - preferably coal ash - mine came from the firebox of a Stroudley 'Terrier' but any coal ash will do! Dry it out thoroughly if it is damp, then grind it to a powder, a teaspoon full at a time, using a mortar and pestle - not the kitchen one if you wish to remain on good terms with the cook of the house! Be warned, this is a long, tedious and dirty job. Pass the powdered ash through a fine mesh kitchen sieve to get out any remaining lumps.
Step 2 - prepare your loco yard area, building up the gaps between the sleepers and between the tracks with light-weight filler - a smooth but uneven undulating finish will give a good result. Paint overall with a matt dirty black, remembering to clean the wet paint off the tops of the rails. Allow to dry.
Step 3 - working from one end of your yard, apply PVA to the surface between two of the tracks covering an area roughly 6" square at a time. Sprinkle the powdered ash carefully and sparingly, stopping before you reach the edge of the glue, then extend the glue area, sprinkle, extend, etc. - keep the process rolling. When the areas between the tracks are complete, repeat for the areas between the rails taking care not to get glue on the inside faces of the rails or near the working parts of points. Allow to dry, then brush and vacuum off any surplus ash.
Step 4 - with an airbrush, damp down the whole area with a solution of water and washing up liquid - not too much, just enough to darken the ash - keep the airbrush far enough away to avoid blowing loose ash around. While still damp, airbrush again, more liberally, with Woodland Scenics white scenic adhesive or similar matt finish adhesive - a light coating of the adhesive will result in a matt, gritty finish, whereas a heavier saturating application will give the ash a smooth slightly oily sheen which can be quite realistic. Allow to dry, then, if ash still comes off on your finger, repeat step 4 until the ash is secure.
Step 5 - piles of firebox ash. I find the easiest way to create these is to make the piles from track ballast secured with PVA - as you would ballast trackwork. When dry, coat with PVA, and apply ash as in steps 3 and 4 above.
And the puddles? - well, that's for another tip!
(.... tip no.15)
scenic model railways'
Modelling Tip No. 8
Winter Trees
Winter is here again - or rather it is supposed to be! Modelling winter trees - deciduous trees without their leaves - is something not often done. Using Seamoss, winter trees couldn't be easier - you simply leave the leaves off! If you want your layout to be set in summer, why not try inserting the odd dead tree amongst your healthy green ones - it can be very effective.
Spray the Seamoss brown with a spray can (Railmatch sleeper grime is a good colour), and, if you are feeling ambitious, drybrush the trunk and thicker branches with a light or medium grey. Leave to dry and your tree is done.
For fallen leaves, a liberal sprinkling of brown ballast into the grass beneath the trees is very effective - I use a mixture of Woodland Scenics brown and dark brown medium ballast. For leaves on tarmac or other non-grass surfaces, experiment with brown scatter materials until you achieve the effect you want.
Another usefull tip for Seamoss is to insert a length of thin piano wire up the hollow trunk. With care, the wire can often be worked quite a long way up thus strengthening the tree considerably. Leave an inch or so of wire sticking out of the bottom of the trunk to help mount the tree on your layout. DANGER. Do not use piano wire where children are involved, or where the trees could accidentally come into contact with eyes and faces.
scenic model railways'
Modelling Tip No. 7
How to ballast trackwork so that it can be replaced
Have you ever tried to replace or alter trackwork that has been set in ballast and PVA? There is no really easy way, but if you lay the track and ballast over greasproof paper it certainly makes future alterations easier!
scenic model railways'
Modelling Tip No. 6
Static!
Have you read the article about static grass in November's Model Rail magazine? And have you been sufficiently impressed to have a go? I hope so, because in my humble opinion it is a brilliant system. But, if you have tried to purchace the Noch 'GrasMaster' static grass dispenser mentioned in the article, you will probably have discovered by now that it seems to be completely unobtainable in the UK (mine came from a model shop in Dusseldorf via a friend of mine who works in that fair city).
However, don't let this small inconvenience stop you having a go at static grass. While you wait for Noch's UK distributor to wake up and get hold of some 'GrasMasters' , there is a very simple, cheap and obvious alternative which works, well, nearly as well!
Do you remember those long ago days of childhood when a party balloon, having been rubbed on your clothing, could be 'stuck' to the wall as if by magic? Well, that's static, and if you pass a suitably rubbed balloon half an inch or so above your static grass immediately after you have dispensed it, hey presto the grass stands up! Don't forget to say some magic words though!
If you can't get hold of a 'GrasMaster' (or can't afford one - they're not cheap), then a few pennyworth of balloon makes a reasonable substitute. It doesn't work quite as well, but it's certainly better than nothing.
Note: GrasMasters are now available from Gaugemaster (Dec 2006)However, don't let this small inconvenience stop you having a go at static grass. While you wait for Noch's UK distributor to wake up and get hold of some 'GrasMasters' , there is a very simple, cheap and obvious alternative which works, well, nearly as well!
Do you remember those long ago days of childhood when a party balloon, having been rubbed on your clothing, could be 'stuck' to the wall as if by magic? Well, that's static, and if you pass a suitably rubbed balloon half an inch or so above your static grass immediately after you have dispensed it, hey presto the grass stands up! Don't forget to say some magic words though!
If you can't get hold of a 'GrasMaster' (or can't afford one - they're not cheap), then a few pennyworth of balloon makes a reasonable substitute. It doesn't work quite as well, but it's certainly better than nothing.
scenic model railways'
Modelling Tip No. 5
Drains and Manhole Covers
Next time you are out and about, take a look around you for drain grates and manhole covers. You'll be amazed how many there are - our landscape is riddled with them! How many do you see on model railway layouts? Well, not many. In fact, often none at all.
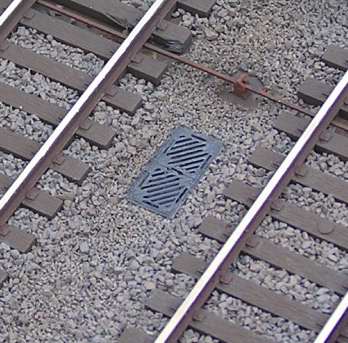
A number of scenic suppliers market etched brass frets of assorted drains and covers - the example shown below is from a Langley Models fret.
They are very easy to fix in place. For manhole covers simply paint each cover a neutral grey and glue in place. For the drain covers, carve or drill a small hollow in your base a fraction smaller than the cover and about 1mm or so deep, paint the inside of the hollow satin or gloss black and glue the cover over the top, taking care not to get glue in the drain cover slots.
For areas to be ballasted, raise the cover on strips of microstrip to set it at the correct height.
scenic model railways'
Modelling Tip No. 4
Paint those bare wooden baseboard sides!
Modelling Tip No. 4
Paint those bare wooden baseboard sides!
To my eye there is nothing worse than a beautifully executed layout with unpainted wooden baseboard sides - and often dirty wood full of screw holes at that.
It doesn't take long to mask off the sides and give them a quick flit with a spray can of matt enamel and you will find it is time well spent. I have used both 'weathered black' and 'roof dirt' (a neutral dark dirty grey) - both available in cans from Railmatch - to good effect, but the choice of colour is yours. I have found that the matt enamel is hard wearing and doesn't mark easily.
If a good finish is important, then fill in the screw holes with light weight filler, sand smooth when dry, and give the wood a couple of coats of Dulux water based quick drying primer (or similar) before spraying. This will give a more professional finish, but with the disadvantage that the white primer may show through if the surface is knocked or scraped, although such damaged is easy to touch up by brush.
scenic model railways'
Modelling Tip No. 3
Scenery construction made easy
There have been many new products over the past few years which have made model railway construction easier, but one of the most useful - and least known - is 'light weight filler' for scenery construction.
Light weight filler is made of millions of microscopic glass beads in a water based paste. It is very light, easy to spread and quick drying. It doesn't shrink or crack, and when dry can be sanded or carved and contoured with a knife.
Method :- build your scenery in your usual way - polystyrene, or modrock over chicken wire. Coat with PVA, and, with the PVA still wet, spread the filler. Up to 2 inches thick seems to be OK in places but is a bit wasteful. When dry, the filler will accept enamel or acrylic paints without further preparation.
Light weight filler is marketed by a number of brands including Red Devil Onetime Filler (1 litre tub) and Mangers Light Weight Filler (1 or 4 litre tubs available through the Johnstones chain of decorators' merchants).
Once you have tried it, you will wonder how you ever managed without it!
scenic model railways'
Modelling Tip No. 2
Two-stage ballasting
Everyone has their own method for ballasting track - this is mine which I find to be very effective. This method does away with that unsightly strip of bare board between ballast and scenery which can be so difficult to deal with!
1 - Having painted up your track, apply an even coat of neat PVA to a strip either side of the track and between tracks, stopping just short of the ends of the sleepers. Sprinkle on a layer of fine grade ballast matererial of your chosen colour, lightly tamp down and hoover off the surplus.
2 - With a medium grade ballast of the same colour, ballast up the track applying just enough to cover the bare baseboard. Tidy up the edges with a fine brush - don't make it too neat. Spray the entire area with a light coat of water/washing up liquid mix - just enough to dampen it - before applying dilute PVA to both grades of ballast in the normal way. When dry, airbrush or otherwise weather the ballast to taste.
2 - With a medium grade ballast of the same colour, ballast up the track applying just enough to cover the bare baseboard. Tidy up the edges with a fine brush - don't make it too neat. Spray the entire area with a light coat of water/washing up liquid mix - just enough to dampen it - before applying dilute PVA to both grades of ballast in the normal way. When dry, airbrush or otherwise weather the ballast to taste.
scenic model railways'
Modelling Tip No. 1
May 2006
Black and White
I NEVER use pure black or pure white anywhere on a layout, as in my opinion they make a model look unreal and 'model-like'. White can be toned down with a wash of very dilute brown or weathered black paint, and for black use a 'weathered black' such as that produced by Rail Match. Pure black (eggshell or matt, never gloss) is limited to pristine locomotives and very clean black cars!
Return to the top of this page
Home Page
Our Layouts
Our Dioramas
Contact us
Copyright
www.scenicmodelrailways.com